From version 23.6.0 the fields "Upper control limit", and "Lower control limit" are no longer mandatory to use. The reason why this was changed was because the two fields were rarely used.
However, if the input type "Number" is selected in the tab Basic data then the remaining fields will be mandatory.
For every row in the Checklist, it is possible to assign a PDF file. Here it is possible to view a blueprint or for example, something that will be measured. If you wish to show a specific text when the user enters an anomaly you can do that in the tab "Basic data", and use the input type "Deviation text". If no text is entered there the query will remain when the user enters values for the different limits here.
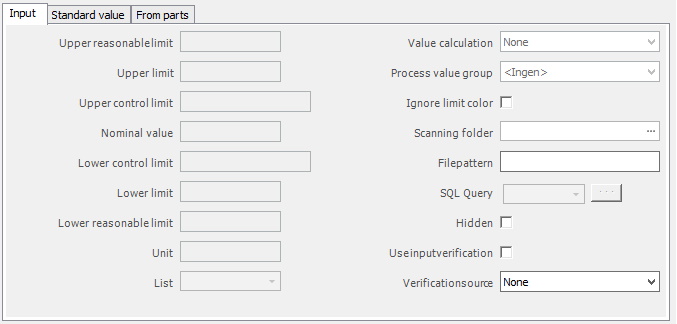
Upper reasonable
limit
Here you enter the limit that the entered value
is NOT allowed to surpass.
Upper
limit
Here you enter the
limit that will issue a warning to the user if it is passed.
Upper control
limit
Here you enter the limit for the first warning that will be
issued to the user, if the value is higher than the nominal value.
Nominal
value
This value will
be the answer to the Checklist query.
Lower control
limit
Here you enter the limit for the first warning that will be
issued to the user, if the value is lower than the nominal value.
Lower
limit
Here you enter the
value that will issue a warning to the user if it is passed.
Lower reasonable limit
Here
you
enter the value that will be the limit which it is NOT allowed to
surpass.
Unit
Here you have to
enter both the type of unit as well as the amount. For example, if it
is 100 meters then enter 100 m.
List
In the tab Basic data it is
possible to select the input type List. If that is done, then this menu will open up
and reveal a list of available Lists to choose from.
Value
calculation
In the
tab Basic
data
it is possible to select the input type Number. If that is done, then this menu will open up,
and here you can choose between None, Calculate nominal value, and Get from
process value limit.
Process value
group
Here
you can determine what process value group, if any, should be associated with
the entered value. A process value group is a group of values assigned to a
group of machines, here
is more information on how process value group
works. In this group of machines, each machine will have this value assigned
to it, for example, it can be a measurement like meters. The system will use the
value assigned when the active machine goes through the Checklist.
Ignore limit
color
Here you
can decide whether or not you should ignore color limits.
Scanning
folder
Here
you enter the search path to the folder where scanned documents are saved.
When the Checklist is performed it is expected that a document from this folder
is being scanned. If that does not happen the system will not consider the Checklist as
finished.
File
pattern
Here you
enter the search path to identify what documents should be attached for this Checklist
row. Joker signs and wildcards are allowed, for example, *tool_id*.pdf for when all
PDF documents which contain a tool id are shown. The folder the contains the file
pattern is the folder entered in the search path explained above in the "Scanning
folder".
However, some special rules apply if "Document scanning" and/or "Automatic scanning of documents" are selected as input types.
When "Document scanning" is selected a folder must be specified which will contain the scanned documents being generated when the Internal activity is executed.
When "Automatic scanning of documents" is selected a search path in the "Scanning folder" menu must be entered that contains the files.
If the system detects files this way, and the user performing the Internal activity confirms it is correct, the file is copied into the directory specified in the "Output directory correct" text field. If it is not correct, then it will be copied into the directory specified as "Output directory wrong".
For each row in the Checklist, it is possible to show a PDF file, for example, to show instructions or blueprints. If there is no PDF file selected when the Checklist was created, the standard file selected will be visible instead.
SQL
Query
Here you can
either choose an existing SQL query or create a new one, in either case, it will
later be used in the Checklist.
Hidden
If this check box is
activated, it will hide fields for input. This is generally used when
automatic values that do not require manual input are used. However, the field/s will
be visible in various follow up such as reports.
Use input verification
If
this check box is activated, then the input value will be verified against
the selection done in the drop-down menu for "Verification
source".
Verification
Source
At the moment, there is only one option to
use here: "Work order materials". If this option is selected, and the input
value IS NOT a match for a part on the work order materials, then the
activity will register as an
anomaly.