The section in admin where you create and/or edit tools contains two tabs. The first one is called "Standard" and focuses ontools. The second one is called "Service" and focuses on services. To see these forms go to "Client" -> "Administration" -> "System settings" -> "Tools" -> "Enter tools" -> "Standard" and/or "Service".
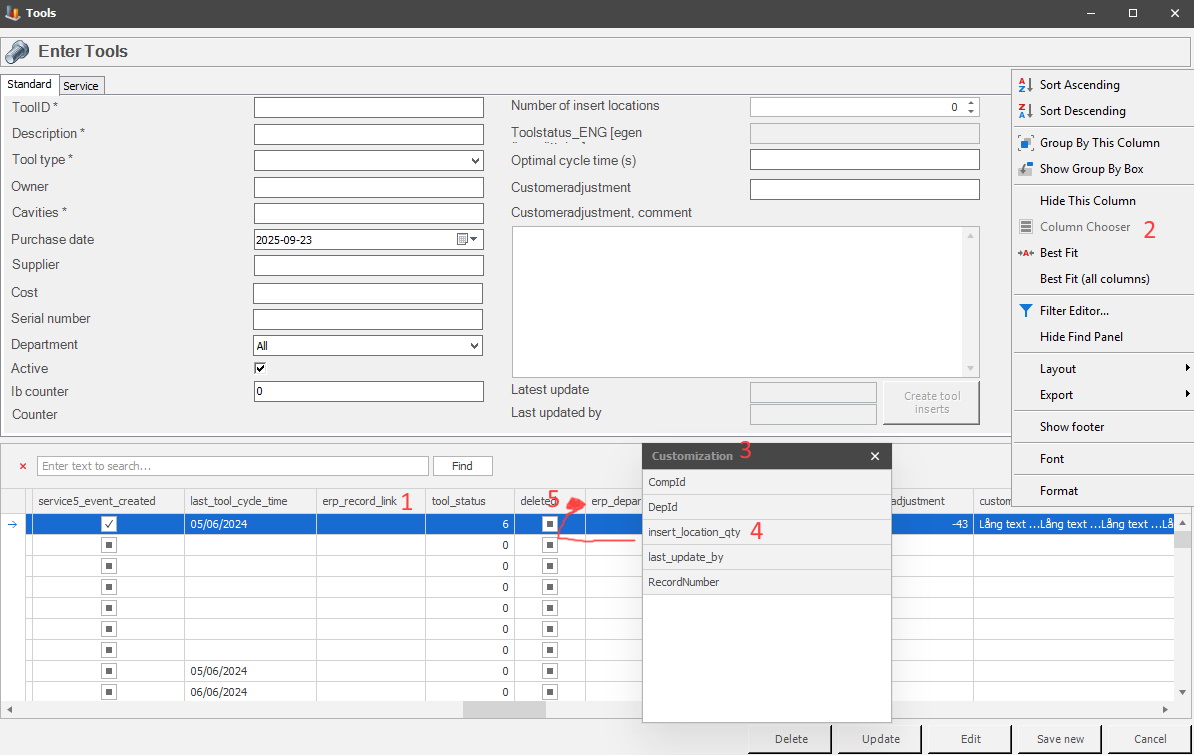
To use the grid system in this form, right-click on a column header, see 1 in the picture above. In the new menu that appears click on the option "Column chooser", see 2. Once that is done a new menu will appear called "Customization", see 3. It is from this list more columns can be added to the table. For example use 4, insert_location_qty to show the number of inserts a tool has in the table. Move this option from "Customization" to the table, see 5.
Please note that menus
with a * are mandatory to use.
ToolID
Here you enter a unique ID of the tool, can be a
combination of numbers and letters.
Description
This is where you enter a description of the tool
that describes what it is for.
Tool type
In this drop-down menu it is possible to select a
type of tool to narrow the search possibilities. Tool types are created in
a separate form via "Client" ->
"Administration" -> "System settings" -> "Tools" -> "Tool
type".
Owner
It is up to each customer to define what "Owner" is. It
could be an operator, the entire company, or a department.
Cavities
Here you enter the number of cavities the tool
has.
Purchase date
Date of purchase.
Supplier
Supplier of the tool.
Cost
Cost of the tool.
Serial number
The serial number of the tool.
Active
This checkbox has to be activated if the tool is supposed to
be visible in the system for eTouch, reports etc. It is possible to create tools in this form and activate them at a
later date. This can be useful if the tools are created for a machine that
is not active but planned to start at a later date.
Department
Here you can select if a
tool should belong to a sepcific department. Be aware that the selection
"All" is standard. That means that the tool will be available on all
machines in all departments. It is possible to create new departments
and/or edit existing ones via "Client"
-> "Administration" -> "System settings" -> "Basic data" -> "Departments.
Ib counter
Here you enter the number of cycles for the tool.
However, this is only used if the tool is used before the system starts.
Counter
Normally this field is empty at first. To see any
information here, select a tool and then press the "Edit" button. Once that is
done this field will show data for the number of cycles this tool has
done.
Number of insert locations
Here it is possible to decide the number of
inserts locations a tool should have. Please be aware that it is possible
to change this from inserts to cavities if needed. This is done via the form
called "Tool cavities" found at "Client"
-> "Administration" -> "System settings" -> "Tools" -> "Tool
cavities".
Create tool inserts
With
this button inserts will automatically be created for the tool selected in the
grid below. The created inserts will be assigned a unique tool ID, and a
corresponding serial number that matches the quantity of inserts
the created tool has.
When the function is used, and the process for it is complete, then the system will show a message that will explain that the inserts have been created. This is connected to the menu explained above, where it is possible to select the number of inserts the tool should have.
Tool status
This field is
connected to the status of a tool which is found in the grid below.
The number will correspond to a description that will in turn correspond to the
status found in the ERP system Monitor. This will be acknowledged by the system
when a tool status is selected in the grid. The corresponding ID will be visible
in the field "Tool status".
However, if the ERP system Monitor is not used, the description has to be changed to match the status found in that specific ERP system. This is done via "Client" -> "Administration" -> "System settings" -> "Basic data" -> "Company specific translation". Here you can read more about how that form works. ID for each translation is listed below.
5 = On loan -
ID - 6343.
4 = Under construction - ID - 6344.
3 = Being manufactured - ID - 6345.
2 = Blocked/Denied - ID - 4098.
1 =
Under calibration - ID - 4097.
0 = Approved -
ID - 6347.
If any other value than those listed above = <Status missing> - ID 6348.
Optimized Cycle Time (s)
From version 23.7.0 a new menu will appear in this form
called "Optimized Cycle Time (s)". Enter a numerical value here, the time
unit used will be seconds, and it will affect what is seen in the eTouch
menu "Production order". It can also be used with
the special
function 419: Fetch planned speed from tool in
Balthzar.
Customer adjustment
From version 24.5.0
the menus seen below will be available. The option for customer adjustment is
used to adjust the number of cycles a tool has. OBS! Be aware that only integer
can be used here.
Customer adjustment, comments
This is
used to add additional information that describes why the customer adjustment
above was made.
Latest update
Here the date, and time,
will be entered for when the customer adjustment was made.
Last updated by
The user that was
signed in Balthzar when the customer adjustment was made, will have their signature
saved here.