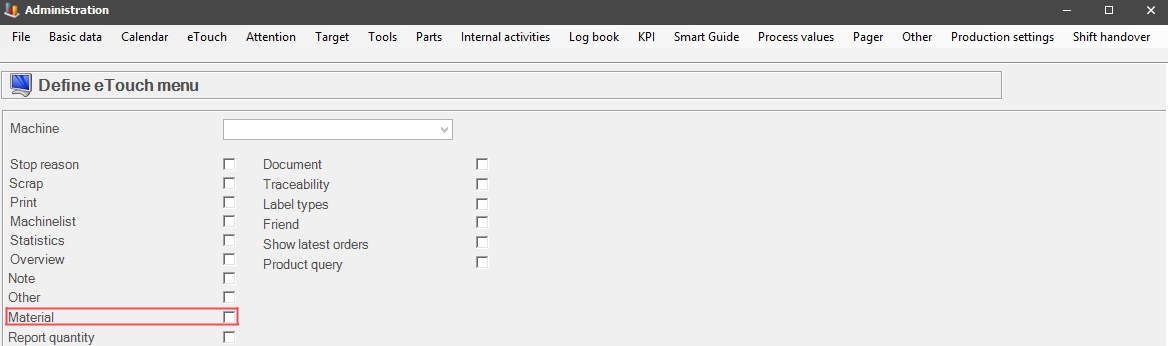
To activate the Material menu in eTouch go to "Client" -> "Administration" -> "System settings" -> "eTouch" -> "Define eTouch Menu". In there activate the Material menu, and it will appear in eTouchs main menu. Here there is more information about how that form works.
When you click on the Material menu icon a new form will appear, as seen in the picture below.
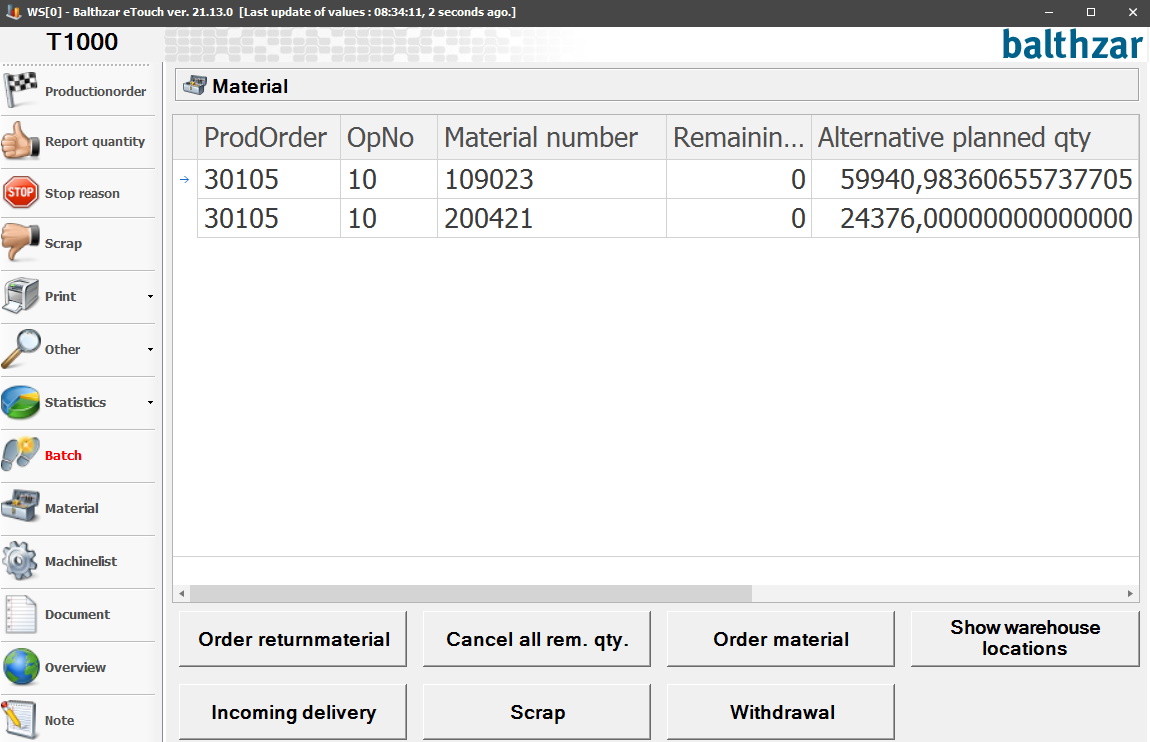
The form seen above is an example of what it might look like in eTouch. It is possible to customize this form if you go to a column header like "Description", and right-click on that column header. Then a new menu will appear, and in there you choose "Column chooser" which will make the menu you can see in the bottom right corner appear. In this menu, you can add or subtract menus depending on your needs. To gain full functionality of this form you have to activate some special functions. First, you have to activate the special function "48 Material reporting" which you can read more about here. This special function will affect how the buttons "Incoming delivery", "Scrap", and "Withdrawal" works. To make this work as intended you need to use Monitor as ERP system, and activate a direct connection to Monitor via "Client" -> "Administration" -> "System settings" -> "Machines" -> "Machine Parameters 1". In there activate "ERP Connected", then select "1. Direct DB Monitor" in "ERP Connection type". Finally, enter the correct information needed for "ERP Resource, and you are good to go. You can read more about how "Machine Parameters 1" works here. As you can see in the picture above the form has several buttons, and they will be explained below.
Order return material
To
activate
this button you have to activate the special function "110: Order
material", and you can read more about how that works here
. What this special function does is that it will
create a predetermined internal activity that will trigger when you press this button. This means that
this button can do several different things depending on your needs. You
create this internal activity via the form called "General Company Settings which
you can find via "Client" -> "Administration" -> "System
settings" -> "Basic Data" -> "General
Company
Settings".
Cancel all remaining
quantity
If you wish to cancel all remaining quantities on
remaining orders you can do this here. To make sure this does not happen by
accident this button will trigger a warning when you press it. When this appears
you have to press "Yes" to confirm or "No" to abort. This warning appears
because if you go through with this action it will not be possible to reverse it
in eTouch.
Order
material
This button also
requires the special function "110 Order
material " to be activated. As
explained above this will create an internal activity that will trigger when you press
the button.
Show warehouse
location
To
activate
this button you need to activate the special function "220 Show
warehouse locations" which you can read more about here. For this button to work
as intended a direct connection to the ERP system Monitor needs to be activated.
You can see more information about how to do that above.
When that is done and you press this button a new form will appear. In this new form, you
have to enter data for material quantity, and batch number, the fields for
the unit, and warehouse location will correspond with the information
shown in the Monitor parts balance warehouse location. To confirm the data entered here
click "Save", or if you wish to abort the
changes you click on "Cancel".
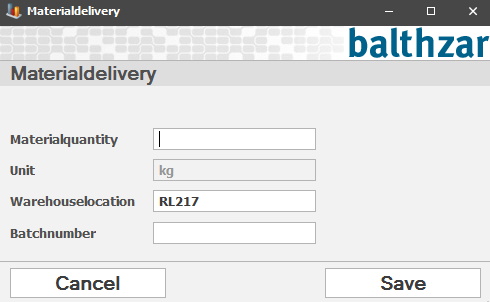
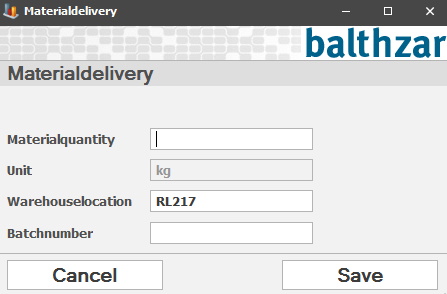
Incoming
delivery
Here you can
administer data for incoming deliveries in the form that appears when you click this button. You
need to enter data for material quantity, and batch number since the fields
for the unit, and warehouse location will correspond with the information shown in Monitor parts
balance warehouse location. When this is done you press "Save" to confirm, or "Cancel" to
abort. If you confirm the changes a message will appear that acknowledge that,
and then you will return to the main form for "Materiel".
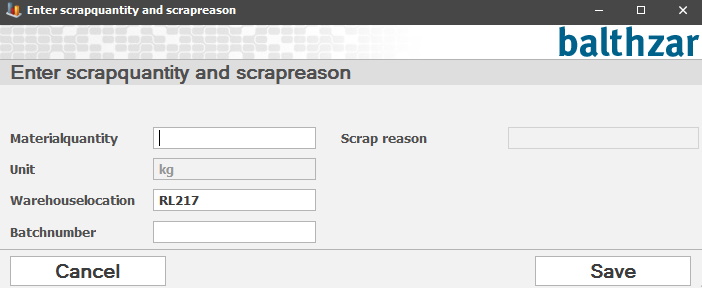
Scrap
Here you can administer data for scrap, and this
is done in the new form which will appear when you press this button.
You have to enter data here for material quantity, batch number, and
scrap reason. In the field, for scrap reason, a list with available
scrap reasons will appear. The fields for unit and warehouse location will correspond with
the information shown in Monitor parts balance warehouse location.
When this is done you click on "Save",
to confirm or "Cancel" to abort. As previously mentioned a message will
appear if you click to confirm the changes that will acknowledge this. Then
you will return to the main form for "Materiel".
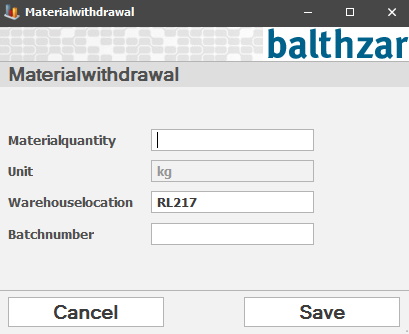
Withdrawal
Here you can administer data
for withdrawals. It works similar to the previous buttons explained above. First
enter data for material quantity, and batch
number. The fields for the unit, and warehouse location will have data
corresponding to the information shown in Monitor parts
balance warehouse location. To confirm changes done here click on "Save", or
if you wish to abort the changes done here click
on "Cancel". When done you will return to the main form for
materiel.