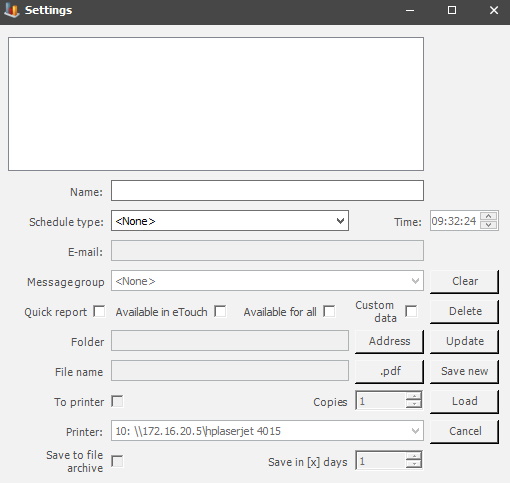
Most reports have access to a settings menu. See the picture below.
in this window, it is possible to save the settings of the report's current selection. If you later come back and want the same report settings again you can go into the settings window and press "load" to get the selection used when the settings were saved. You can find an explanation of the different menu buttons below.
Name
Here
you have to enter a name for the report.
Schedule
type/Time
It is possible to schedule a report based on the
selection available here. Once a time span is selected, then select a specific
time as well. Then decide if the report should be sent to one user, enter an
E-mail address below, or several users, then use a Message group instead.
E-mail
Here you
can enter the email address that this report should be sent to.
Message
group
If you wish to send this report
to more than one email address you select a message group. To create, and/or
edit Message groups go to "Client" ->
"Administration" -> "System settings" -> "Basic
data" -> "Message groups".
Quick
report
Determines if
this report should be a quick report or not. This will also affect reports
in the web application BZX21. If this is activated this will show reports in the
main menu under reports - quick reports, or in the widget called quick
reports. The checkbox Available in eTouch must also be activated.
Available in
eTouch
Determines if this report should be available in eTouch or
not.
To change a report to quick reports in the web application BZX21. Activate the checkbox "Quick report", and then the checkbox "Available in eTouch". Once that is done the report is available as a quick report in BZX21. Either in the web applications main menu, or in a widget called quick reports.
Available for
all
Determines if this report should be available for all or not.
Custom data
Determines if
this report should have access to custom data or not, this means that the
report's data will be based on selections from eTouch rather than Client.
Folder
Press the address button to gain
access to Windows Explorer. Then pick a location to save the report.
Filename
Here you enter the filename for the report. If it is a .pdf
type report, you can click on the .pdf button to confirm this.
To printer/Copies
If you wish to
print this report you have to activate this button, you also have to determine the
number of copies that should be printed.
Printer
Here you select
what printer should be used to print this report. To add, and/or edit printers go to "Client" -> "Administration" -> "System settings" -> "eTouch" -> "Printers".
Save to file archive
If
you wish to save this report to the file archive you activate this button. You
can then find it via "Client" -> "Administration" -> "System settings"
-> "Basic Data" -> "File storage" -> "Database Files". Here
is
more information about it.
Save in X days
Here you
determine how many days the report will be saved. You can enter a number
manually or use the arrows. If for example, you enter seven days the report will
be saved in the system for seven days.
Clear
Here you can clear
the information in the currently active field.
Delete
Here you can select
a report and remove it.
Update
Here you can select
a report and update it.
Save
new
Here you
can select a report and save any changes made to it.
Load
Here you can
refresh the data for the selected report.
Cancel
Click this button
if you wish to leave this menu and return to the "Client".