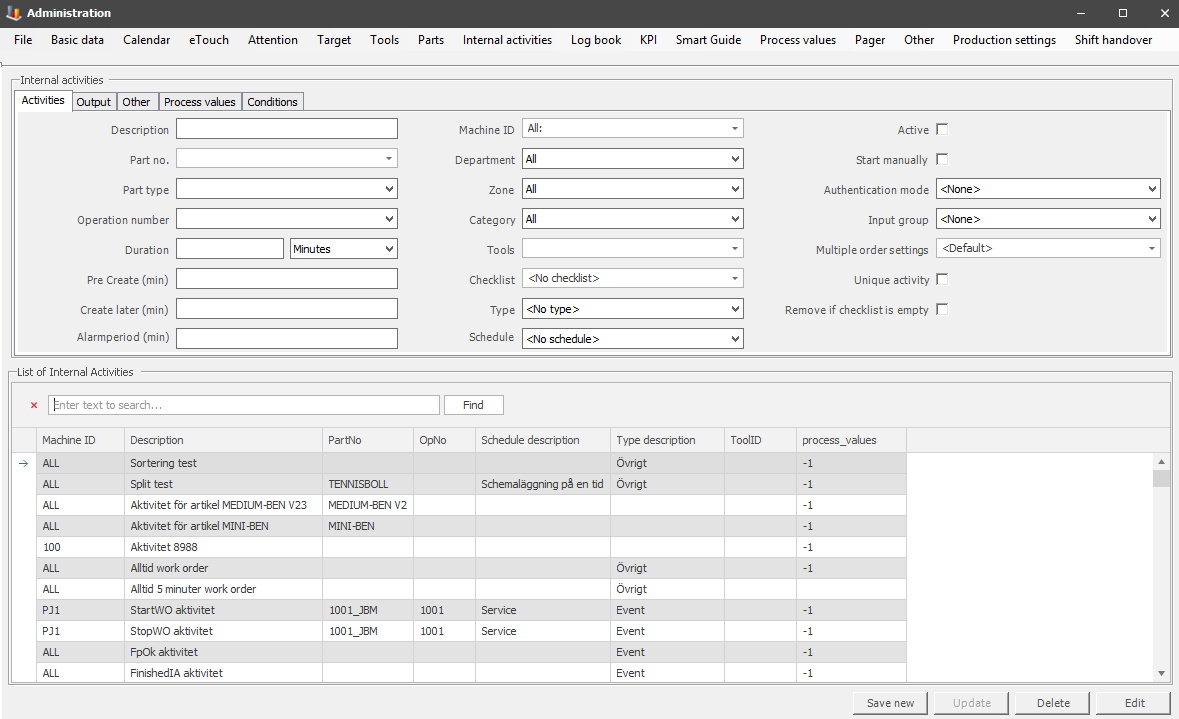
In the tab for "Activities", you will create and maintain different Internal activities who in turn will control what will happen, and when to activate different activities. They can include a Checklist, but that is not mandatory. It is also possible to create an activity based on a schedule, but that is not mandatory. You can reach this tab via "Client" -> "Administration" -> "System settings" -> "Internal Activities" -> "Action" -> "Activities". A picture of the tab can be seen below.
Description
Here you can
enter a description of the internal activity, this description will later
be used as an identifier of the created Internal activity.
Part.no
Here you can select
a specific part number, and when that is done it will affect the created
Internal activity. If the selected part number is running on the active machine
the created Internal activity will run as well. If the selected part number is
not running on the active machine the created Internal activity will not run
either.
Part.type
Same as above but
for part type.
Operation
number
Here you
enter a numeric number for the operation.
Duration
Here you can
choose if you wish to have "Duration" based on "Minutes" or
"Cycles". When that choice is made you enter the number of either "Minutes" or
"Cycles" in "Duration".
Minutes/Cycles
Here you
select if you wish to base "Duration" on either "Minutes" or "Cycles".
Pre Create
(min)
Here
you can enter the number of minutes for when the Internal activity should be
created before it is scheduled to start. This field only affects created
Internal activities which have been assigned a schedule of the type "Time".
Create later
(min)
Same as
the above, but here you enter the number of minutes for when the Internal
activity should be created after it is scheduled to start.
Alarm period
(min)
Here
you enter the number of minutes that will determine when an alarm will be set
off in conjunction with the execution of the created Internal activity. It is
important to know that if there should be NO alarm at all you
have to enter a negative number here, for example, -1.
Machine ID
Here you
select a machine ID for the created Internal activity.
Department
Same as above but
for the department.
Zone
Same as above but for
the zone.
Category
Same as above but
for the category.
Tools
Same as above but
for tools.
Checklist
Here you can choose
if the created Internal activity should have a Checklist assigned to it or
not. However, if it should not have a Checklist assigned the option "No
Checklist" MUST BE selected.
Type
Here you can choose
what type of the created Internal activity should consist of. This will
later be used when the created Internal activity is searched for,
filtered, or listed in Balthzar. To edit, and/or create new types go to
"Client" -> "Administration" -> "System settings" -> "Internal
activities" -> "Type". Here
is more information on how
that works.
Schedule
Here you can
determine which schedule the created Internal activity should have. It is
important to know that if the created Internal activity SHOULD NOT
have a schedule assigned to it you have to select the option "No
Schedule".
Active
Here you can choose if
the created Internal activity should be active or not. This will in turn affect
the options to schedule it and/or start it manually. If you do not activate
this check box it will not be possible to schedule it and/or start it
manually.
Start
manually
This check
box will determine whether or not it will be possible to start the created
Internal activity manually.
Authentication
mode
Here it is possible to determine what type of authentication
level the created Internal activity should have. Right now, there are three
different options here, and they are "None", "User with verification", and
"User without verification". The choice made here will determine if the created Internal
activity should require an employee number to log in to run it or
not.
From version 24.6.0 there is a new option here called "User with manual verification". If this option is selected, the system will always ask for the employees number, even if the employee is already checked in at the machine. The idea behind this new option is that sometimes one employee could be checked in on the machine. Then another employee has to perform the internal activity, with this option this other employee can be checked in on the machine as well. This will also affect the web application BZX21.
To see more information about users, and/or employee numbers go to "Client" -> "Administration" -> "System settings" -> "Basic data" -> "Users". Here is more information on how that works.
Input
group
Here you can
choose to pick an input group for the created Internal activity rather than a
checklist. When you have selected the input group you have to enter the specific
settings for that group. It is important to know that if the created Internal
activity SHOULD NOT use an input group you have to choose the
option "None".
To add new input groups, and/or edit existing ones go to "Client" -> "Administration" -> "System settings" -> "Production settings" -> "Input groups". Here is more information on how that works.
Multiple order settings
In this drop-down menu there are two options,
"Default", and "One activity with joined
Checklist".
Unique
activity
When this check box is activated, it will only be possible
to have one instance of the Internal activity open per machine at a time.
Remove if checklist is
empty
From version 24.6.0 and onwards this checkbox is
available. If it is activated, it will perform a control of the activity. If the
activity has a checklist assigned to it, and that checklist is empty, ie the
checklist has
no
rows, then the activity will be removed.
The idea is that it should be used during material exchange
with additional
functionality
found
in the section for Checklists - Conditions.