
In the menu for Basic data there is only one menu for Users. In that menu there are three different forms for User settings 1 / User setings 2 / Web settings which all have separate documetnation. This section will cover User settings 1 found via "Client" -> "Administration" -> "System settings" -> "Basic data" -> "Users" -> "Users settings 1".
Fields marked with * are mandatory. Please note that the checkbox "Active user" MUST be activated on all users that wish to gain access to the system. If a user is created without this checkbox activated, that user will not be able to log in at all. From version 26.4.0 the search bar is activated as standard in this form.
OBS! There was bug in older versions of Balthzar, this bug made it impossible to use the same employee number / pin code for a user. The system would consider this to be a copy, and not allow it. This is fixed from version 25.5.0, and onwards. If older versions are used, then enter a unique number for employee number, and pin code to get around this problem. Be aware that it is not allowed to leave the fields empty in older versions either, since this will also count as a copy. For any additional help / information please contact Delacroys support.
If there are any problems, please double check that the right adress is used in the Balthzar Server Login menu. This might sound obvious, but if the company is part of a corporate group where several companies use Balthzar with different adresses this is extra important to check. Client as a program can work to some extent, even if it is the wrong adress in the Balthzar Server Login menu.
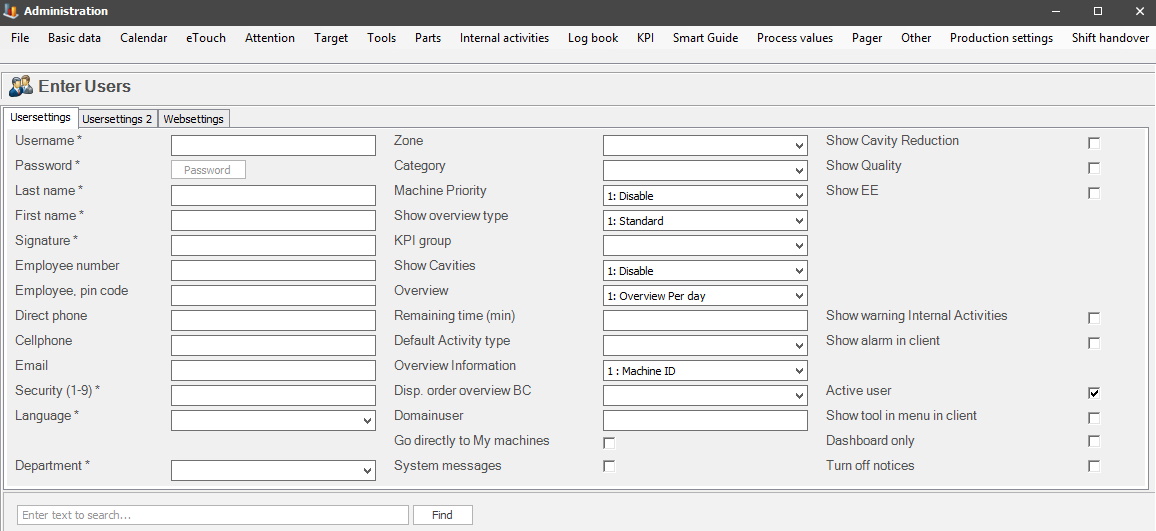
Username
Login name
for a user. Usually letters, 2-10 characters.
Password
Password for the current user. It is
recommended to use a mix of numbers and letters. From version 23.5.0 there is a
new feature available that will make it possible to update a user
password. Here is more
information on
how that works.
Lastname
Last name
of the user.
First name
First name of the user.
Signature
User
signature.
Employee number
It is up to each customer to define exactly
what the employee number is. It can be a combination of either numbers, or
letters. The only requirement is that every user must have a unique employee
number. This can be used as a search criteria in different sections of the
system.
Employee
pin code
This is
an alternative method to sign in employees instead of using a password. The pin
code used to verify the employee is determined by system admin. Has to be a
unique numerical value.
OBS! It is
possible to use the same employee number / employee pin code for one
user (for example 4444 / 4444). But it is NOT possible to use
the same employee number / employee pin code on more then one user.
For each user they have to be unique.
Direct phone
Users direct number.
Cellphone
Users cellphone
number.
Email
Users
email.
To change access
rights to a form, go to "Client" -> "Administration" ->
"System settings" -> "Access rights Pages - Client". Here is more information on
how that works. Please note that it is up to each customer to define
what the other security levels mean, ie, security level 2-8.
Please note that it is Delacroys developers that change the name of the choices, as well as the number of available choices in this menu. Contact the support if any additional help is needed here.
Department
Users default department. Once a department is
selected here, that department will be the department the user will be logged
into. It is possible to add new department/edit existing departments via
"Client" -> "Administration" -> "System settings" -> "Basic data" ->
"Departments".
Here
is more information on how that works.
1.
Disable.
2. Show.
3. Change.
Show
overview type
Determines which overview type is shown
when the user logins. This is done in the main menu in Client via
View.
Here
is more information
about it.
KPI group
Specifies which KPI group this user
belongs to. (This is a separate add-on module.)
1.
Disable.
2. Show.
3. Change.
Overview
Here you can
select a type of overview for the user. Per day/Per shift/Per 24h/Calendar.
This can be changed in the main menu of Client via View. Here is more information about how it works.
Overview
information
Here
there are four different choices that will determine the accessibility to
machines in the Overview in the Client. Either search/view on only Machine
ID, or a combination of Machine ID, and Category/Description/Partno.
1.
MachineID.
2. MachineID/Category.
3. MachineID/Description.
4. MachineID/Part no.
Display order overview BC
As standard
nothing is selected here, however it is possible to choose to sort the overview
in the
Client on either MachineID, or Machine
Description.
Domain user
If the user
desire automatic login, this must be activated. The feature of
automatic login will match the user username/password with the information in the
domain user field. If a match is found the system will automatically log in
the user. If a match is not found, the automatic login will fail.
Instead, the user is required to do a manual login into the system. Here
is
more information on how automatic log in, and domain user work.
Go directly to
My machines
A checkbox
indicating whether the user should be taken to the overview "My machines" by
default when logging in. To edit old Overviews/create new Overviews for machines
go to "Client" -> "Main menu" -> "Overview" -> "My machines". Here
is more information on how
that works.
System
messages
Determines if the user should receive
system messages, and various warnings. For example, the system admin might set
up that he/she should get a warning if there are any
problems during reporting between Balthzar, and the
ERP system.
Show cavity reduction
Determines if cavity
reduction should be shown in the default overview for this user.
Show
quality
Determines if quality should be shown in the default overview for
this user.
Show
EE
Determines if EE should be shown in the default overview for this
user.
Show warning Internal
activities
Determines if warnings should be shown to this
user when Internal activities are used, and they have not finished
properly. Here
is more information on how Internal activities are used.
Show alarm in
Client
If
this checkbox is activated, then a new menu will appear in the Clients left side
menu called Alarm. Here
is more information on how it works.
Active user
Activate this checkbox if you wish to make the user
account active and available to use in the Client. This is an alternative to
completely removing a user account, if you leave this box unchecked the user
account can be activated later on.
Show tool in menu in client
If this checkbox is activated, you will be able to see a
new menu in the Client called "Tools". Here you will gain access to some of
the functionality you have in the administration of tools. The menus for "Tool", "Tool inserts" and "Saved points " are available
here.
Dashboard only
This checkbox will only affect the web
application BZX21. Once activated the user will have its navigation capabilities
limited to Dashboards only when using BZX21. It can be used as a shortcut
if a specific user should only have access to a Dashboard on a
machine.
Turn off notices
From version
23.6.0 new functionality is added which will let users send/receive notices from a third-party
application called Pushover.net. With
this checkbox is it possible to turn that off for a specific user.
The reason for this is that this functionality is connected to Message groups and all members in a specific Message group will either be able to send or receive them. If one member of the group does not wish to have this functionality, then activate this checkbox for that user. This is useful if a specific user is a member of several message groups, but do not want notices from all of them.
Be aware that each user needs a specific key to
activate this, which is entered on User settings 2.
Search function
If you want to search for a specific
user, you can do that by clicking on the looking glass located above the table
showing available users. Then you will see a field appear where you can enter
the user's name and then to confirm you click
"Find".