Please note that this form can be found in two different places of the Client. Here in the Report section of the main menu, and also in the menu called Basic data in the admin section. See links below:
"Client" -> "Main menu" -> "Reports" -> "Report settings".
"Client" -> "Administration" -> "System settings" -> "Basic data" -> "Report settings".
The version of Report settings in the Report section will only show reports based on the user. This difference is visible in the selection for the column user name in the form seen below, and in the form seen in the Admin section. To read more about what types of reports Balthzars supports, go to the Report documentation.
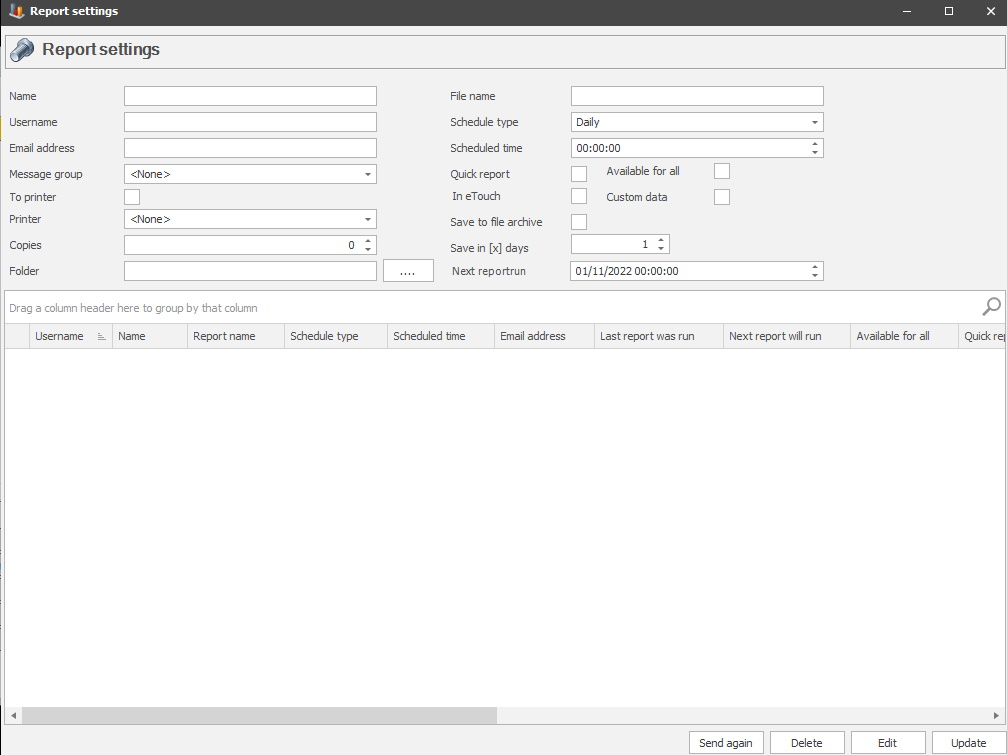
From version 22.8.0 several changes were made to this form. Two new columns appear called Last report will run/Next report will run. There is also a new field called Next report run.
This form is dynamic and supports Balthzars grid system. To activate it right-click on a column header and select "Column chooser" in the menu that appears. When that is done a new menu will appear, as seen in the bottom right corner in the picture above. From here you can either add new columns or remove old ones. It is also possible to group one or more columns to see data for only the selected column/s.
Name
Here you can see the
name of the selected report.
User name
Here
you can see the user name connected to the selected report.
Email address
Here you see
the email address connected to the user of the selected report.
Message group
Here it is
possible to select a message group that will receive the report. A message
group is created via "Client" -> "Administration" -> "System
settings" -> "Basic data" -> "Message groups". Here there is more information about how
that works.
To printer/Printer
First activate the
checkbox for To printer, once that is done select the printer in the
drop-down menu of available printers. if the checkbox is not activated, then the
selection in the printer menu will be mute.
Copies
Here you can decide
how many copies of the report should be printed.
Folder
Here you can use the search function to find the
folder.
File name
Here you can see the file name connected to
the selected report, if that exists.
Schedule type
Here you can select a special type of
schedule for the selected report. The options are:
Daily/Monday/Tuesday/Wednesday/Thursday/Friday/Saturday/Sunday/Monday-Friday/Tuesday-Saturday/First
day of the month.
Scheduled time
This is
connected to the choice made above. For example, if Monday is selected as
schedule type, and the time entered is 10:00:00, the selected report will
be scheduled to start on Mondays 10:00:00.
Quick report
If this
checkbox is activated it will be visible in the Quick reports menu in the Print
menu in eTouch. However, the checkbox for In eTouch must also be activated.
Available for all
This
checkbox will determine who can access the selected report. If activated all can
access it, if not activated only the creator can access it.
In eTouch
If this checkbox
is activated the selected report will be visible in the Quick report menu, in
eTouchs Print menu. However, the checkbox for Quick report must also be
activated.
This checkbox will also determine if the report will be available in the web application BZX21. If iti s activated, the report is available, if it is not, the report will not be in the web application. There is a report section in the main menu for BZX21, as well as a Widget called quick reports.
Custom data
If this tick
box is activated the selection the report is based on will change. Now the
selection will come from eTouch instead of Client.
Save in [x] days
The
number of days the system should save the report. It is important
to not choose a low number of days here, since the system will
remove the report after the selected number of days.
Save to file archive
If you wish to save this report to the file
archive you activate this button. You can then find it via "Client" ->
"Administration" -> "System settings" -> "Basic Data" -> "File storage"
-> "Database Files". Here is more
information about it.
Next report run
This field will show
data for date/time for the next report run, if that exists. To change date/time
in an existing report, first select the report in the form seen above, second
click on the button Edit to activate the field. Third confirm any/all changes
done in this field with the button Update.