This step by step guide is intended to explain how Internal activities can be used to send messages in different scenarios. In our example a machine will need service after 100 units is produced. In Internal activities a schedule will be set up for this, as well an action that will control when messages should be sent out, and to whom.
The first step is to create a schedule that the action in Internal activities will be based on. This is done via "Client" -> "Administration" -> "System settings" -> "Internal activities" -> "Schedule". Here there is more information on how that works. In our example this guide will focus on a fictive scenario where a machine will need service after 100 units are produced. When the production goal is reached, the system will send out messages to the operators to alert them that the machine needs service.
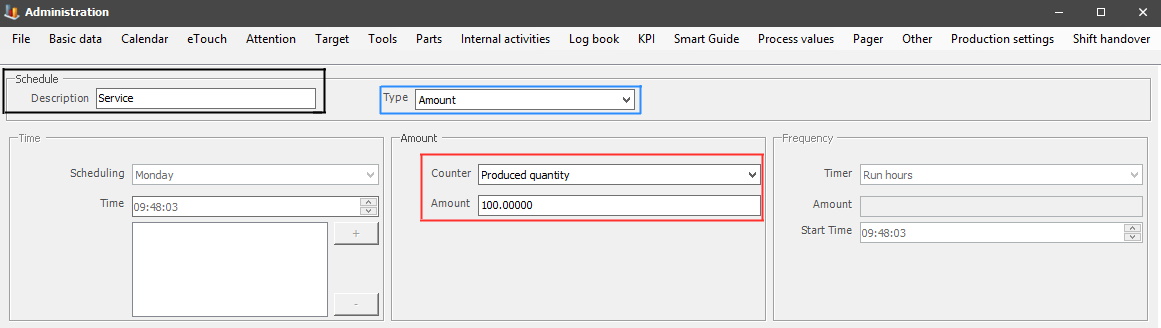
In the black box the name/description of the schedule is entered. In the blue box the type of schedule is selected, as you can see below three options are available. Time, amount, and frequency. In the red box the type of counter is selected as produced quantity, and the amount is in this scenario 100 units.
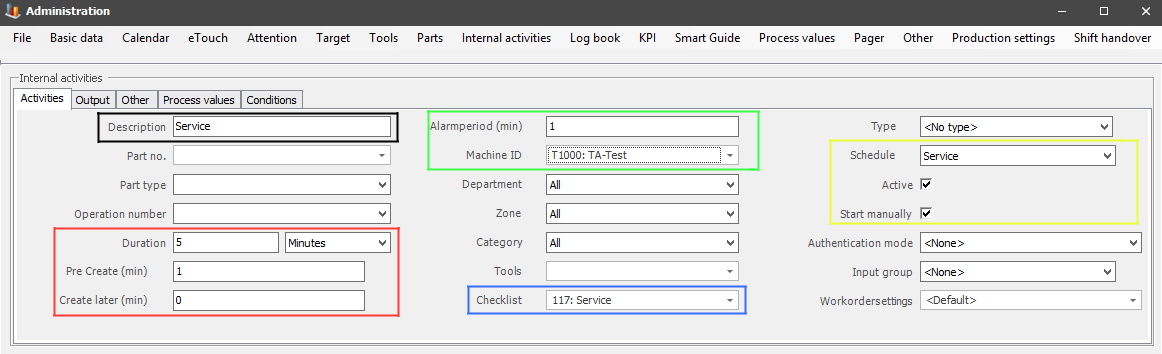
When the schedule is created the next step is to go to "Client" -> "Administration" -> "System settings" -> "Internal activities" -> "Action". Here there is more information on how that form works. In this scenario an action called "Service" was created.
in the black box the name/description of the action is entered. In the red box the amount of time for the alarm is set in minutes, as well as conditions for creating the alarm before and/or after the production goal is reached. In the green box the alarm period, and the machine is selected. It is possible to select more machines, as well as departments, zones, categories.If a checklist is needed this is selected in the blue box. In the yellow box the schedule is selected. The tick boxes for "Active", and "Start manually" has to be activated. This will determine weather or not the action will be able to use a schedule/start machines manually.
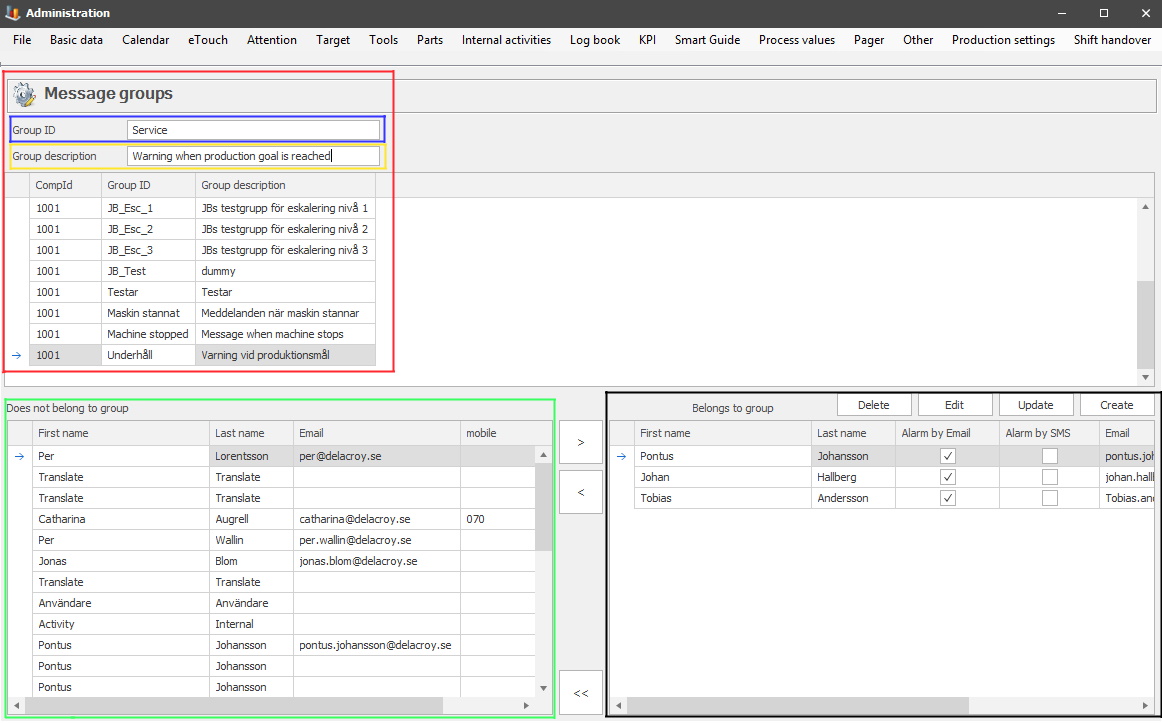
To create a message, either to one person, or several persons, go to "Client" -> "Administration" -> "System settings" -> "Basic data" -> "Message groups". Here there is more information about how that form works. As you can see in the picture below, it is here you decide if the person/s should recieve alarms by Email/SMS or both.
In the red box you can see where you create the message group. In the blue boxe you enter the name/ID for the message group. In the yellow box you enter a group description. In the green box you will see the employees available to add/remove to a message group. Select an employee, then use the arrows in the middle to move them between the green and black boxes. In the black box the employees in the message group will be visible. It is also here you can select if they should recieve a message via Email/SMS or both.
It is also possible to send messages when creating Checklists in Internal activities. Go to "Client" -> "Administration" -> "System settings" -> "Internal activities" -> "Checklist" ->"Output from row". Here there is more information on how that form work. To activate the tab for "Output for row" go to the tab for "Basic data". Here there is more infomration on how that tab work. In there select input type "Yes/No with deviation" or "Yes/No without note". Do not forget to activate the tick box "Output from row" as well. Once this is done the tab for "Output from row" will be available.
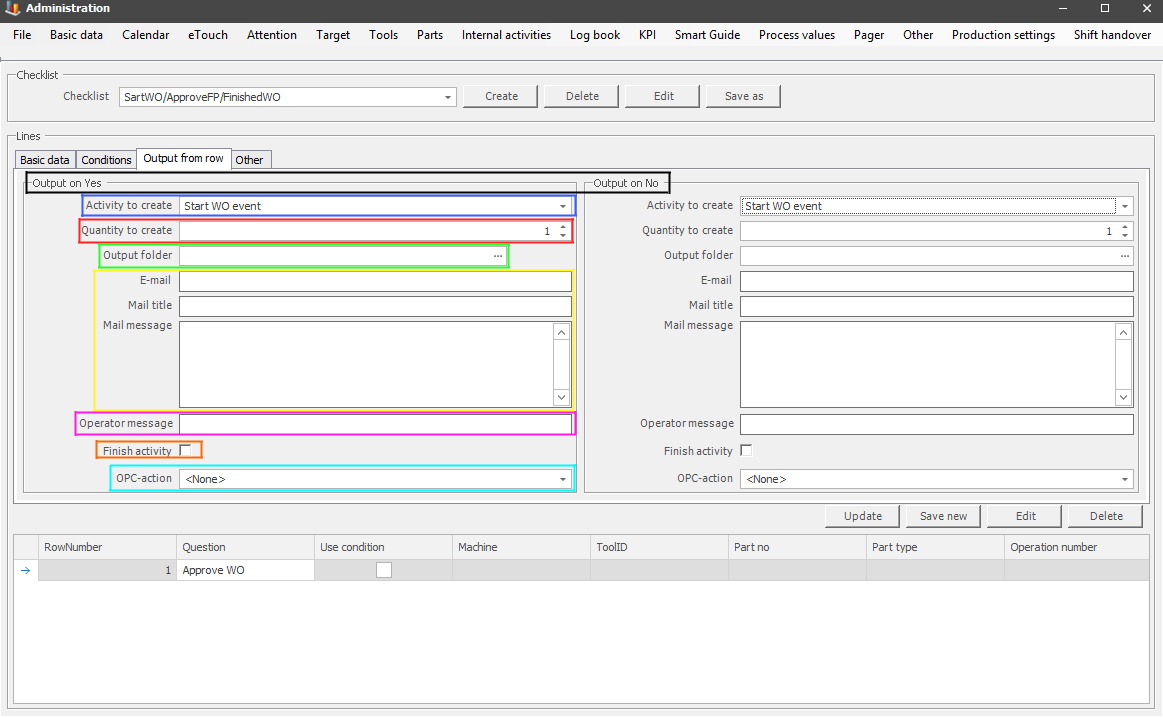
It is the same process to create messages regardless of if the message is "Output on Yes" or "Output on No", see the black box. In the blue box you select the Internal activity the system will create, and in the red box the number of that selected Internal activity. In the green box select it is possible to select a search path for addtional documents/data.
In the yellow box the message email address/mail title/meail message will be entered. In the purple box a hard coded text message can be entered for operators. This message will be visible in eTouch when the Internal activity is activated. If the tick box in the orange box is activated the Internal activity will be finshed once an answer is provided on the corresponding checklist row. In the turquoise box it is possible to select an OPC Action. To edit/create OPC Actions go to "Client" -> "Administration" -> "System settings " -> "Process values" -> "OPC Action". Here there is more information on how that work.