This step by step guide will go through the process of how to set up a short automtic stop resaon in the Client, and in the web application BZX21. Which can later be used in the Graphical history hour as well. Several settings in the admin section of the Client has to changed for this to work as intended.
In the picture above, the colors for the stop reasons are assigend via "Client" -> "Administration" -> "System settings" -> "Basic data" -> "Stop reasons" -> "Stop reasons tab 1" -> "Color". In that drop-down menu a specific color can be selected for a specific stop reason. In the example above the colors are coded as: green = run time, orange = automatic stop reason, yellow = uncoded stop reason. This is just an example, it is up to each customer to define their own color scheme. OBS! Run time is always green, it is the other colors that can be customized.
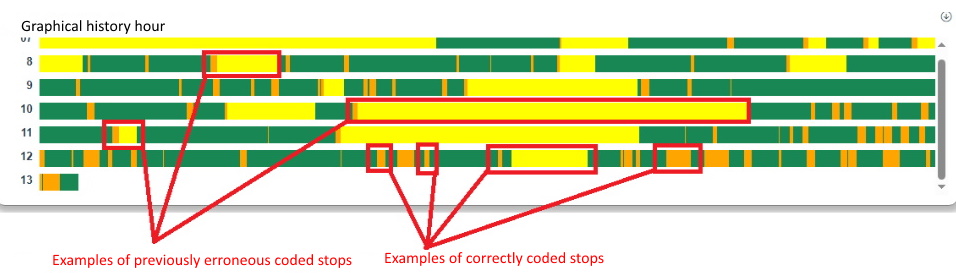
The reason why the first example is wrong, is due to the color coding. Hour 8 in the first example is green / orange / yellow = run time / automatic stop reason / uncoded stop reason. This is wrong because the time of the stop reason was longer then expected for what is considered short stops. The correct color code for hour 8 should instead be only yellow, not as now, orange and yellow. A correct example is in the third box of hour 12. This is because the idea here is that it should be coded as green / orange / green, or green / yellow / green. Which means run time / automatic stop code / run time, or run time / uncoded stop / run time.
This guide aims to explain how to set up a short automatic stop for 180 seconds. This is done in two steps. First create a stop reason for the short automatic stop, second, this automatic stop reason must be reset. The reason for this is to gain the production phase of green / orange / green according to the example above.
The two stop reasons is sorted by the system via type of codes, and Break1 will have a specific code type of one (1), then Break2 will have another code type of nine (9). This is changed in the admin section of the Client via "Client" -> "Administration" -> "System settings" -> "Basic data" -> "Stop reasons" -> "Stop reason tab 1" -> "Type of code".
How
to set up Break1
How
to set up
Break2
Be aware that the machine in question has to have an active, calendar, and an activte work order. If this is not the case, then the Graphical history hour can not show any data. To activate a calendar go to "Client" -> "Administration" -> "System settings" -> "Calendar". For work orders go to "Client" -> "Left side menu" -> "Production order".
To see Graphical history hour in the Client, go to "Client" -> "Left side menu" -> "Graphical history hour". In the web application BZX21 go to the top right corner of the interface. Use the menu there, and then go to the option called "Edit Template". This is where it is possible to add / remove Widgets to a machine in BZX21.
There is a specific setting in the machine parameters that has to be activated as well. Go to "Client" -> "Administration" -> "System settings" -> "Machine parameters" -> "Machine parameters 3" -> "Automatic stop reason". In that drop-down list select the stop reason, and it will automatically change status to be an automatic stop reason on the selected machine.
It is also important to know that there is something called special functions. This can give extra functionality if activated. If the selected machine has any special functions activated this might affect what is seen / what works. This documentation is made for the standard functionality, which means NO special functions. To see if a machine has any special functions activated, go to the "Client" -> "Administration" -> "System settings" -> "eTouch" -> "Special function by machine". In that form, select the machine, then it is possible to add / remove special functions for that machine in that form.